All posts by admin

Star Photography Basics to Capture a Dazzling Night Sky

For amazing star photography, you only need three things: a full-frame camera, a tripod, and a wide-angle lens. Throw in a dash of patience and a bit of serendipity if you are trying to capture a shooting star! OK, you do not need all three things above for great star photography, but they will certainly make your job a lot easier. Here’s how to set your camera to give your picture the best chance of coming out great.

Exposure Settings for Great Star Photography

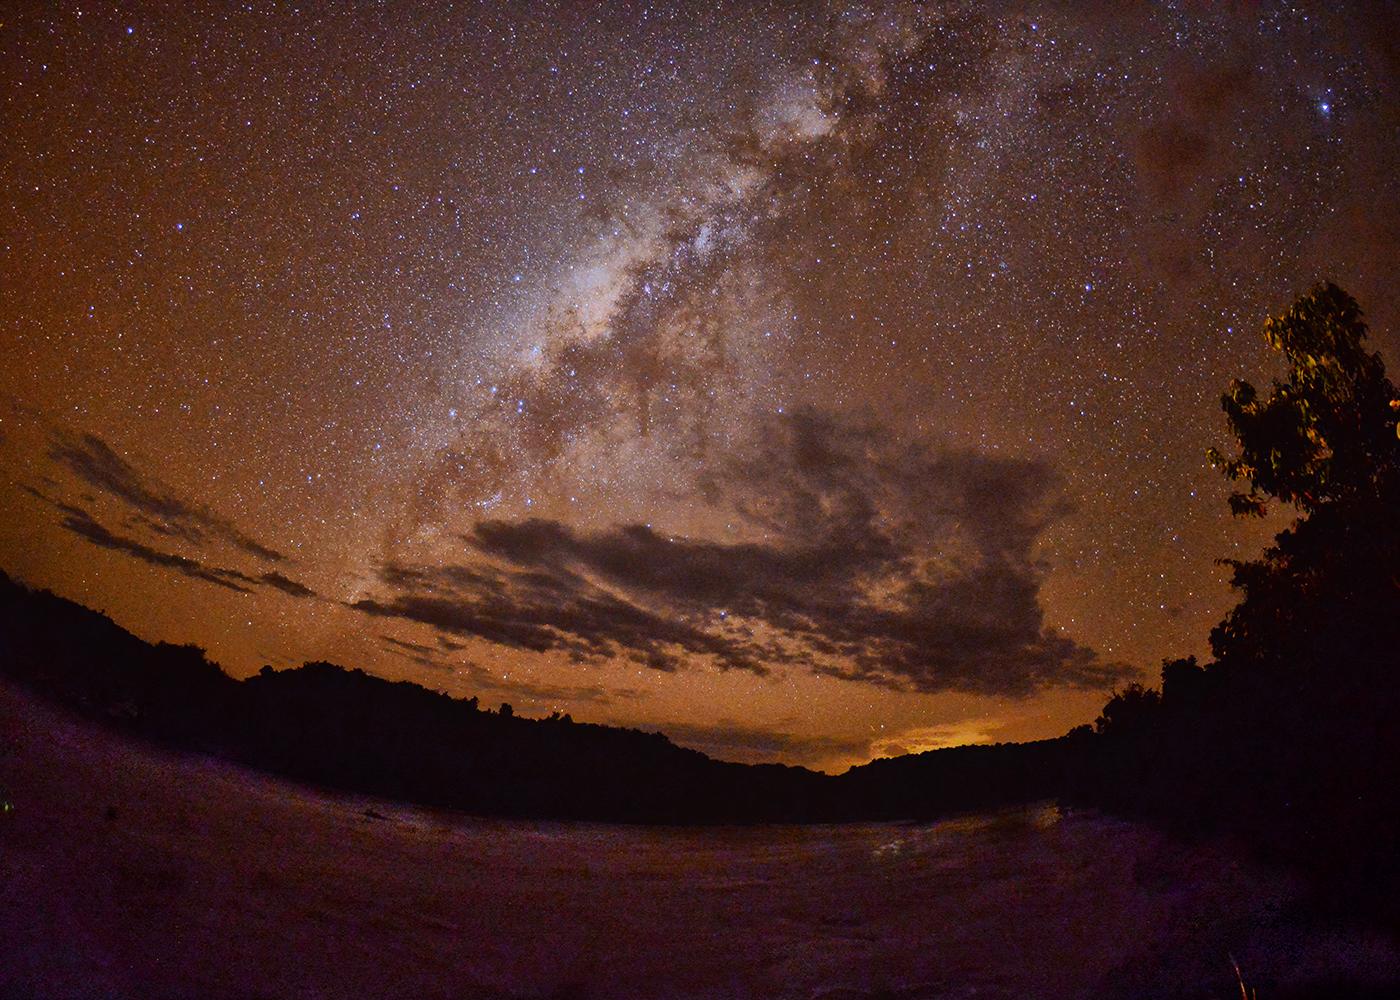
First, decide if you want to shoot a long exposure with the stars creating circles or arcs, or if you want to capture the night sky with, say, the Milky Way. The most important variable in this decision is the exposure. In order to create “star trails” we will want long exposures, say from 1 to 8 hours depending on the effect you desire. This will give you long arcs of light as the stars move through the sky as the aperture remains open. To create night sky shots emphasizing the sky and stars, set your camera for less than a 20 second exposure, f/5.6-f/8, ISO 2000. The important thing to remember is that to “freeze” the stars in place you need a shorter exposure.

Temperature Settings

Kelvin temperature and white balance settings are your friend in star photography. Different Kelvin temperatures will highlight different areas of the sky. Lower temperatures will tend to emphasize the stars themselves as they will be bluer, little orbs of light. Higher temperature settings will emphasize the gaseous warmer clusters of the Milky Way. Here trial and error are important. If you don’t know what effect you really want, try a number of different white balance settings and then compare them when back on the computer. Additionally, you can always change your white balance in post-processing. The other wonderful thing about digital versus analog is that today’s digital sensors can record a much wider range of light than we can see with the naked eye, so even if the Milky Way isn’t clearly visible with the naked eye, it may be visible to your camera’s sensor.

Don’t Forget Context


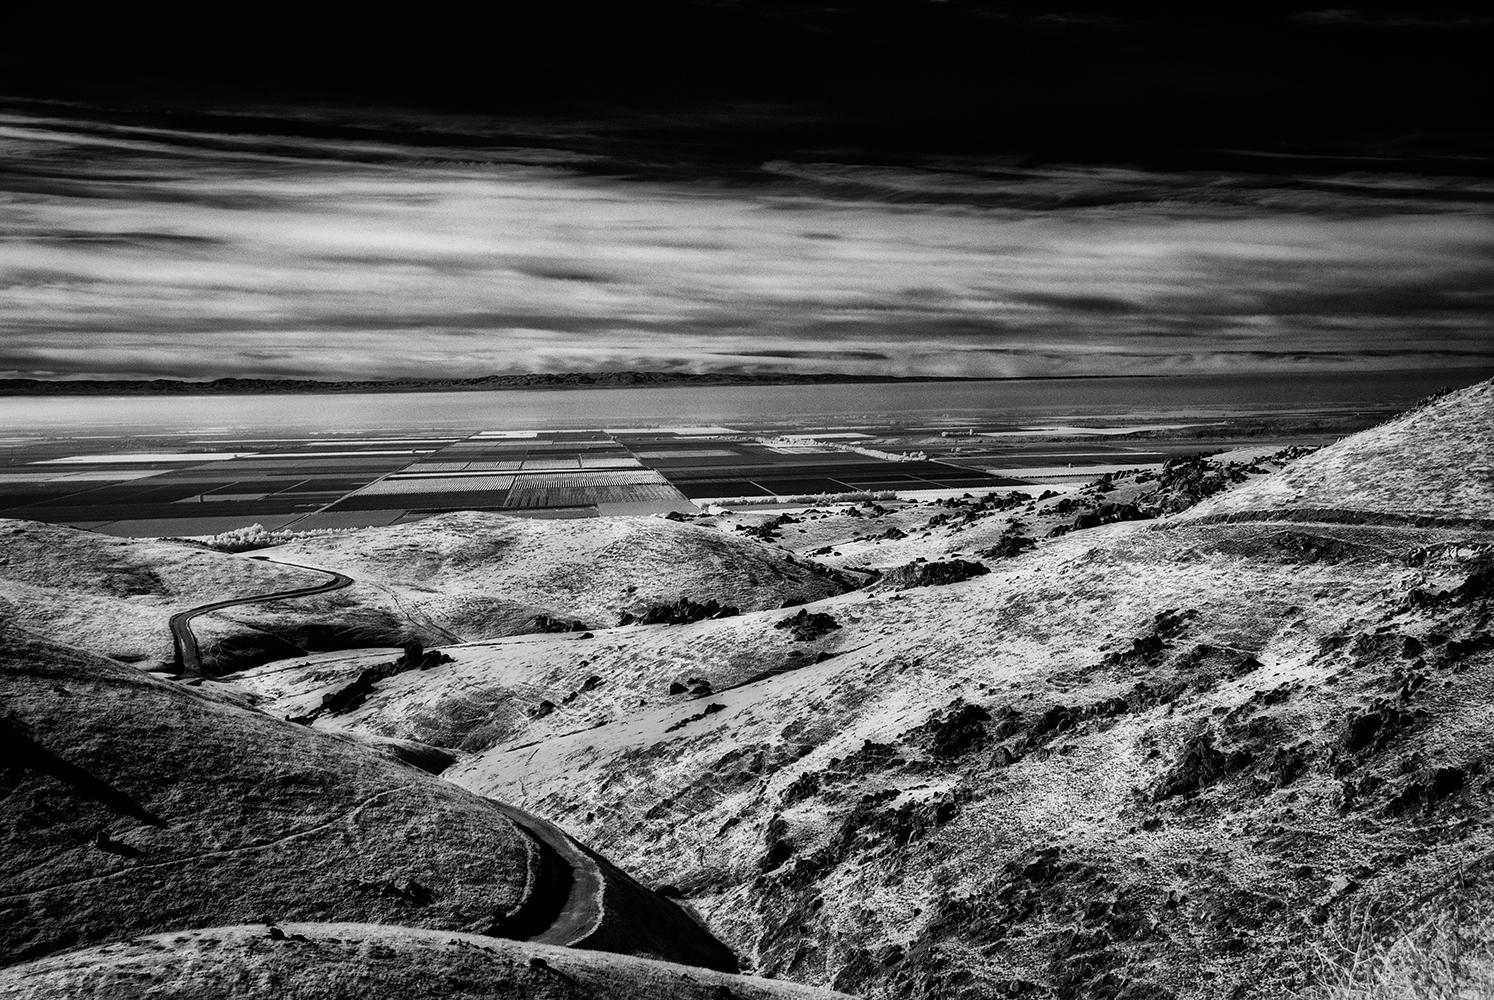
As a nature photographer, you know the importance of scale. When dealing with massive subjects — like the Grand Canyon or a giant wave or a redwood tree — you need to give the eye something of a familiar size so the true scale of the subject is apparent. Common examples would be having a person or tree in the foreground. With star photography, scale is also incredibly important. After all, what’s bigger than…space? Give the viewer context to the setting of your star photography by including a foreground and provide a sense of scale by having something of a familiar size in it. You may also consider adding light to your foreground through a number of different methods.

How to Shoot a Shooting Star

The most active meteor showers generally produce about 50 to 100 meteors an hour (the Perseids being the most prodigious), or about one to two a minute. That means that even with lots of meteors, you have to be an active shooter, but also plan on lots of time with a hit or miss attitude. As a general rule of thumb you will likely want to use a slightly longer exposure time to increase your odds of having a meteor streak through and be recorded on your sensor. For meteor showers you will need a “dark sky” location away from light pollution. Additionally, though we know what part of the sky will produce any particular meteor shower (the Perseids are in the northeast sky, depending on your location) where they enter the atmosphere is random, so to increase your odds of capture I recommend a wide angle lens. And as always with any night shooting, a tripod is a must. One trick to increasing the apparent number of meteors you’ve photographed is to do numerous shots and then do image stacking in post-production.


When and where to catch the two biggest annual meteor showers: Perseid Meteor Shower, Orionid Meteor Shower.


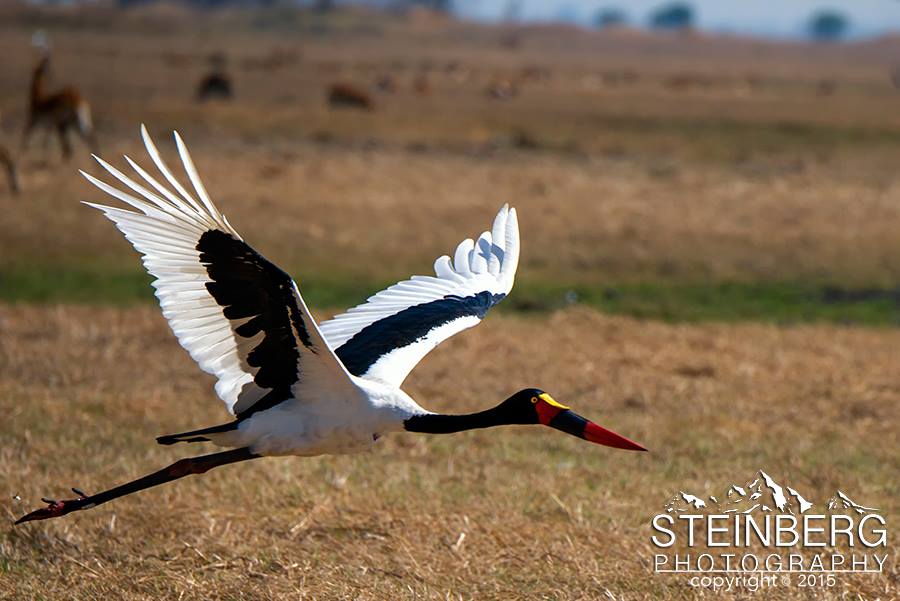
Pictures from the Maasai Mara National Reserve in Kenya


Nikon D800 – 10.5mm lens – Exposure: f/2.8 25 sec. ISO 4000.


NikonD800 – 24mm lens –Exposure: f/4.5 30 seconds ISO 2000  – White Balance 2650K


NikonD800 – 24mm lens –Exposure: f/4.5 30 seconds ISO 2000 – White Balance 5500K

Learn Landscape Photography from the Pros

Learn the tricks of landscape photography from an award-winning photographer! Join other aspiring photographers on a photo adventure with Jim and Lori Steinberg of Steinberg Photography. To see where we are headed next, check out our Workshops and Photo Tours!

How to Use a Camera Trap to Photograph Wildlife

A camera trap is a camera that’s set up to take a picture when triggered by an animal. They’re becoming an increasingly popular method for capturing wildlife, as photographers find the process both thrilling and rewarding when they finally capture an elusive critter. 

Once set up, the traps can be left for days or weeks at a time, depending on the battery life of your camera. The longer you leave it, the better your chances of returning to find that some critter has made an appearance. 

You can purchase pre-built camera traps or try your hand at making your own camera trap house with this handy guide. Make sure that your camera trap house is well put together to protect your camera from the elements and any animals that may try to get their paws, claws, teeth or beaks into it. 

Setting Up Your Camera Trap

The success of your trap depends on setting it up in the right location. You have to predict where your subject will be in order for it to trigger your trap. 

A walk through the forest can reveal to you where your subject makes regular trails. When you spot thin lines of compressed blades of grass, you can carefully follow them to your target’s location. Once you do, whether it’s a den, burrow, or another habitat, you can look along the trail for places that bottleneck, or areas that your animal will have to pass through that are particularly narrow. That is where you should set up your trap.

Setting Up a Trigger

Once you have your location, you need a way of setting off the camera. There are two ways to do this, either by using a passive infrared (PIR) motion sensor or an active infrared (AIR) sensors. 

PIR is basically like a patio light sensor; something passes in its field, and it fires. It’s very simple and easy to set up. 

AIR is a beam that transmits from an emitter to a receiver. It is triggered when an animal breaks the beam, making it more precise as well as more complicated to employ. It is also expensive. 

Lighting Your Camera Trap

It would be a shame to go to such lengths and not be able to see your subject. In a perfect world, you will find a way to light your shot, without looking as though you have lit your shot. You can use a TTL cord to set up one or more off-camera flashes. Getting the flash away from the camera will help reduce red-eye and create more natural-looking shadows. Placing the flash at a 45 degree angle from the lens is a good starting point.

Patience is a Virtue

Camera-trap photography requires an immense amount of patience. Once you have your trap set, it is best not to disturb it. The more you adjust your trap, the more likely your subject is to detect your presence and avoid the area altogether. 

Even if you do everything right, you still may come back to find nothing worthy of note on your camera. Don’t give up! Once you do finally get that perfect shot, it will all be worth it. 

Join Us for a Photography Adventure in 2019

  • Southern Colorado High Country – July (2 spots left!)
  • Oman – Late Fall 2019


3 Majestic Winter Photography Locations

We are half-glass-full type people, and that’s why instead of bemoan the coming of winter, we head outwards to take in the most beautiful sights we can. Below are three renowned winter photography locations. If you are looking for a guided tour, scroll to the bottom of this blog and see where Jim & Lori Steinberg of Steinberg Photography are heading next!

1. Winter Wonderland in Japan

Aomori in winter is a sight to behold. Thanks to its location where winds from the surrounding mountains collide, rise, and cool, Aomori receives frequent and intense snowfall. An amazing 21.95 feet of snow fall on Aomori each year, with six feet of it falling in December alone.


To put that in perspective, Syracuse, New York, perennial winner of the Golden Snowball Award for most snow in any U.S. city, averages less than 10 feet a year!


Opportunities for winter photography abound. From a ride on the Tsugaru Railway to see the beautiful winter landscape to the Aomori snow monsters which are, amazingly, the tops of trees poking up through the snow, Aomori is a safe bet if snow is in your agenda.

2. Winter Wilderness in Yellowstone National Park

See everything from buffalo, bison, elk, bighorn sheep, and antelope to wolves on the hunt in Yellowstone National Park, one of the most breathtaking locations for natural beauty in the United States — or anywhere in the world for that matter.


When to go? Though most of the park’s campgrounds, lodges, stores and restaurants are closed for the winter, two lodges remain open, as do several visitors centers. Ranger-led expeditions are offered at Old Faithful and Mammoth Hot Springs, and other park partners lead guided activities throughout the park. More information can be found here: https://www.nps.gov/yell/planyourvisit/visiting-yellowstone-in-winter.htm

3. There’s More than Ice in Iceland

There is lots of ice in Iceland, but that’s not all. This rocky volcanic island northwest of Ireland is just several hours from major Northeast and Canadian airports, and its natural wonders are nearly too numerous to list.


From the otherworldly landscapes of the Westfjords to the majestic Kirkjufellsfoss waterfalls and the famous ice caves of Iceland, this little island has a little bit of everything!

Join a Photography Expedition with Photographers Like You!

Interested in learning the art of photography in a wild and exotic location with two seasoned professional photographers and a group of photographers that are as enthusiastic as you? Look no further than a Steinberg Photography Photo Tour.

Snow Photography: Filter, Shutter Speed, Focus and More!

Snow photography can be a real challenge. Digital cameras are designed to capture light, and they can be overwhelmed by the blinding whiteness of freshly fallen snow. There’s nothing more frustrating than beholding a beautiful nature scene and finding that your pictures do not do it justice. This blog will help you understand some basic photography terms, troubleshoot your problems and get the most from your snow photography!

When to use a Polarizer

As far as filters go, polarizers are among the most popular regardless of the time of year. They give blue skies a dark and powerful blue hue. They add definition and layers to clouds while eliminating glare and giving colors more saturation. Use the graduated neutral-density filter when it is necessary to equalize variations in exposure in different parts of the scene, say between the brilliant blue sky in the background and the fields of snow in the foreground. A three-stop (No. 8) gray graduated neutral-density filter is useful for many snow photography scenes.

When to Use Manual Focus

When big, fluffy snowflakes are falling right in front of your lens, or when there is extreme overcast or fog, use manual focus. The problem, of course, is that there is so little contrast that the lens cannot find anything to lock onto. Your camera’s autofocus feature will naturally flutter as it tries to decide what your subject is: the snowflakes or fog in front of you or the family of deer in the background. Use manual focus to get the shot you want. If you are waiting for wildlife and will need to take a shot at exactly the right moment, keep your manual focus on so you are ready to shoot when your subject presents itself.

When to increase your shutter speed

Heavy snow is falling but you want to stop motion and clearly capture a scene, like a bear scratching his back on a tree, or a wolf drinking water from a stream.

When to decrease your shutter speed

Snow is falling, or there is another object in motion, and you want to emphasize the movement of the snow or the movement of your subject (a rabbit rushing through the snow, for example). That’s when you use long exposure by decreasing your shutter speed.

When to Play with White Balance Settings

If your snow is coming out with a bluish shading, play with your camera’s white balance (WB) setting to give it a truly white appearance. White balance settings control the “temperature” of the color. While “cooling” filters give snow (and everything else) a blue color, “warming” filters do just the opposite. If your snow is coming out blue, try out a warming filter to balance it out. Some WB settings come with options for “shade.” These also work well.

When to add positive compensation (overexposure)

Achieving the correct exposure is one of the greatest challenges of snow photography. Your camera’s metering system is calibrated to base their exposure on a neutral tonality, a neutral gray. A landscape dominated by white snow will throw your metering system haywire as it attempts to compensate for the brightness. The result will be dull grey now, not brilliantly white snow. To get your camera to truly capture the scene before you, you have to add positive compensation (overexposure). On an overcast day, overexpose by +1 stop exposure value (EV). On a bright and sunny day, +2 stop EV may be required. Anything beyond a +2 stop EV may result in the image looking whitewashed with little detail. If your camera has an Exposure Warning setting, your camera will automatically highlight or point out areas that are overexposed. If the picture looks great but there are a few spots of overexposure you want to smooth out, try increasing your shutter speed.


Don’t miss our blog about the world’s most majestic winter photography locations!

Prints, Guided Photo Tours, Workshops and More!

Steinberg Photography is your source for world-class landscape photography prints and calendars, guided photo tours and photography workshops. We hope you will take home some of our prints or join Jim and Lori Steinberg on an exotic photo tour! Visit our homepage for more information.

Wide-Angle vs. Telephoto Lenses: What They Are & When to Use Them

Any discussion on the differences between wide-angle and telephoto lenses ought to start with the human eye. The angle of view that we humans have is 55 degrees. This is equivalent to a 43mm lens. Thus lenses that offer a greater angle of view are considered wide-angle lenses (taking in a greater field of view). Those that offer less are considered telephoto lenses (taking in a smaller field of view).

When starting out, it’s a good idea to get familiar with your camera and all of its functions. As you get more comfortable and you start to take more photographs you’ll begin to see shots that you may not be able to capture with your current lenses, and then you’ll know it’s time to start trying new ones. Wide-angle and telephoto lenses both offer unique and very different perspectives, unparalleled by the human eye.

Wide-Angle Lens

Wide-angle lenses offer a wider angle of view (from 60° to 180°). With these smaller focal length lenses, you capture a larger scene in the frame. It allows you to see more of the landscape from the foreground to the horizon. It is useful if you are trying to show context and add details to your scenery, especially your foreground.

Wide-angle lenses allow you to show off close up details as their distortion enlarges objects in the foreground, while the center of the image looks farther away when you are shooting from the ground.

With wider lenses the edges of your frame can get stretched out, making lines and horizons look curved. This may either enhance your shot or not. You can certainly learn by trial and error, but having an idea when you should use a wide-angle lens will help.

When to Shoot With a Wide-Angle Lens

There are some circumstances when a wide-angle lens is advantageous. These are a few:


– Capturing a table full of food

– Taking group shots in confined spaces

– Showing off an entire room

– Taking photos of a building and architecture

– Capturing skyscapes and cityscapes

– Taking wide panoramic landscapes

– To increase the visual distance between your subject and the background

Telephoto Lens

A telephoto lens lets you capture subjects further away and appears to bring them closer. Telephoto lenses are divided into three categories: short (65mm to 135mm), medium (135mm to 200mm), and super (focal lengths going beyond 200mm).

Shorter telephoto lenses are more practical for everyday use and carrying around as anything bigger than 300mm is generally too heavy to carry around and certainly not meant for handheld picture making.

Remember the general rule of thumb is that a person can handhold an image for the same time as the focal length of the lens at ISO 100: so for a 50mm lens one can easily handhold at 1/50 sec., but at 300mm the most one can generally be steady would be 1/300 sec.

Telephoto lenses are great for compressing distance and creating the bokeh effect, where your subject is highlighted and the background is softly blurred behind. Longer telephotos (200-600mm) are also good for photographing animals where getting too close is not, or should not, be an option. And short telephoto lenses (85-135mm) are perfect for portraits and macro work. (Remember: to blur the background, move your subject away from it and use a wider aperture to put the focus on your subject and blur the background.)

When to Shoot With a Telephoto Lens

Depending on the type of photography that interests you, a medium or super lens may not be necessary. However, if you want great close-up shots without moving closer, you want a telephoto lens. You may also want one if you are:

– Shooting sporting events from the sidelines or stands

– Considering wildlife and nature photography

– Into astrophotography

– Obsessed with moon close-ups

– Trying to decrease the visual distance between your subject and the background

– In love with bokeh

Do not confuse the term “zoom” with either wide or telephoto. A zoom lens is one that incorporates a variety of focal lengths (such as a 28-70mm or 70-200mm), as opposed to a fixed focal length lens such as an 85mm.

Join Us for a Photography Adventure in 2019

– Southern Colorado High Country – July (2 spots left)

– Oman – Late Fall 2019

Visit our Workshops & Photo Tours page to tell us which trip you’re interested in, and we’ll send you more info!

Photography Etiquette: Respecting Other People, Religions and Cultures

As we enter the holiday season, it’s worth noting that it has many different meanings to many different people. For some, the holiday season is a time of deep religious reflection. For others, it is simply a time to spend with family and friends and exchange gifts. The United States is a melting pot. For instance, on December 8th Buddhists all across the U.S. celebrate Bodhi Day, a holiday that commemorates the day when the Buddha sat beneath a bodhi tree an attained enlightenment. Jews celebrate Hanukkah for eight days in December as well. Christians celebrate Christmas on December 25th. There are also many secular and cultural holidays celebrated throughout December.


Why does all this matter? Culture and religion are intertwined. As a photographer that travels the world taking pictures of people from many different cultures, I have to understand what is appropriate and what is not, what is respectful and what is considered rude, and so on.


Photography Etiquette 101


  • Do some reading

Though you can’t be expected to understand everything about a foreign country, its culture, or its history, you can learn enough to get by. Avoiding the most egregious faux pas — like ordering beef in India, where the Hindu population considers cows sacred — can be avoided in one or two day’s worth of research. Most travel guides will include a section on do’s and don’ts for any given country.

  • Smile and then nod at your camera

Some photography etiquette is universal and will serve you no matter where you are. Smiling and nodding at your camera is one example. If you have any fear about going to a new place and taking pictures of people from a different culture (or even in your own) do not fret. Simply making eye contact with your subject, smiling and nodding at your camera will cover you in about 90% of situations. You will know by their body language whether they want to be photographed or not. It will be obvious. They will return your smile and get back to whatever they were doing. You then take your picture and move on. As you become more experienced, you’ll come to understand that your demeanor has everything to do with the quality of the shots you are taking.

  • Opt for a shot from medium distance

To capture an authentic moment in time, a candid shot, you can’t be too close or too far. Too close and you risk making your subjects feel uncomfortable. You become the center of attention and your images won’t capture the authentic “moment in time” you were after in the first place. Taking pictures from too far away is a good way to convince people that they have a private investigator following them — also making them uncomfortable and suspicious.  Opt for a reasonably long lens, something between 80 to 200 millimeter zoom.

  • Learn the language

Understanding the basics of a country’s language is a necessity. Words and phrases like please, thank you, goodbye, etc. will go a long way toward easing your travels and putting your subjects at ease. The more of a language you learn, the more you will be able to engage and elicit reactions from your subjects. If someone is selling something on the street and you want to take a picture of them, a great way to break the ice is to ask them what they are selling. Start small and work your way up, focusing on useful phrases that will help you get through the day. Study continuously on your trip. Being immersed in a new language is the fastest way to learn, so take advantage of it!

Join a Steinberg Photography Photo Tour

Looking to experience the glacial blue lakes, roaring waterfalls and ample wildlife of the Canadian Rockies? Join Steinberg Photography for for a Photo Tour on the Trans Canadian Highway from Banff to Jasper.

Learn more


3 Black and White Photography Questions You Were too Afraid to Ask

Is black and white photography an anachronism, a relic from a previous time? Is it simply an artistic preference or does it offer advantages over color photography in certain situations? No worries. We have all the answers to the black and white photography questions you were too afraid to ask. Let’s get started!

Why would I use black and white photography?

black and white photography 1

Black and white photography, also called monochrome, isn’t just artsy for the sake of being artsy. It is an excellent choice if you want to show form, shape, tonal contrast, or the quality of light — all the things that are obscured by the variance of color inherent to color photography.

What subjects lend themselves to monochrome?

Anything may make an interesting black and white picture if the lighting is right and the photographer understands how to use the camera settings. But the subjects that lend themselves best to monochrome include patterns, textures, lines, shapes and moods. For instance, the pattern created by the rolling hills of South Dakota may be obscured by the brilliant color of the hills. By switching to monochrome, you can highlight the shapes of the hills and therefore highlight the pattern. Because we see in color, it can be difficult to find good subjects for black and white photography.Try thinking less about the centers of things, the usual focal points. Look instead for the borders where things meet.

Do I still need to use a filter?

Good digital cameras have monochrome settings, so you can shoot in black and white rather than turning it monochrome after the fact. But you will still need to control the light and the tonality of the image with filters.  Red, green and orange filters are the most commonly used depending on the subject and circumstances.

Looking to Learn the Craft from an Expert?

With more than 40 years of experience Jim and Lori Steinberg of Steinberg Photography can help you understand what filters to use and when.  We travel the globe to take amazing pictures and often take students with us.

If you’re interested in joining us or arranging for a private tutorial, check out our Workshops and Photo Tours page or contact us directly.

Dispatches from Ethiopia: Mek’ele Camels

We recently traveled to Ethiopia is East Africa and would like to share some amazing images we captured there. We hope you enjoy!

Camels are the main method of transport in the Afar region. They can carry heavy loads in hot weather for long distances on small amounts of water, all necessary requirements for survival in the Danakil where difficult conditions make it hard for anyone and anything to survive. After being loaded with 400 pounds of salt blocks the camels and their drivers have a long trip to market. The walk to Mek’ele is 5 days, though today they only walk to the small town of Berhale where trucks now transport the salt from there. But the trip is still arduous.          

Ethiopia 3


Using a 400mm lens for this shot I was able to compress the distance and show the camel train seemingly close to the mountains, which in reality are still quite a long way off, as is their destination.

After being relieved of their load the camels make their way back in the early morning to the Danakil to pick up another yet another load of salt and do it all over again. As seen here the desert is rocky and difficult terrain to navigate. I made this shot at 6:22 in the morning before the heat of the day became overly oppressive. The key for me on this shot was to keep the tops of the camels below the horizon line created by the hill behind them in order to create a single unbroken line of camels.

Ethiopia 4

Dispatches from Ethiopia: Salt Miners of the Danakil Depression

We recently traveled to Ethiopia is East Africa and would like to share some amazing images we captured there. We hope you enjoy!

The Danakil Depression in the northern part of the Afar triangle (formed by a triple junction of 3 tectonic plates) and is often called the cruelest place on earth. I prefer to think of it as just ‘hell on earth’. At 440 feet below sea level and dropping more every year, the temperatures regularly are in the mid 120’s F — and that’s on a nice day.

The wind blows, the sun scorches and the lack of humidity sucks all moisture from the body. Yet this hostile and brutal land provides some of the most unique photography to be found. It is home to the semi-nomadic Afar people who have mined salt here (remnants of when this area was part of the Red Sea) for thousands of years. Over the millennia their techniques and tools have not changed. As you see here they use the same hand carved wooden poles as their ancestors to pry loose blocks of salt from the surface of the saltpan.                                   

Ethiopia


After separating the salt block from the pan, they then use hand-hewed axes to cut the blocks into uniform sizes. Each block is exactly the same, and this is all done without the use of any measuring instruments. The instincts of hundreds of generations assure the uniformity. The only concession to the modern era – the Nike socks. This series was made late in the afternoon. The air was still and the temperature was 125 F. The surface temperature was even warmer. These hardy people work in these conditions from 7:30-4:30 on only 1 liter of water, unlike the photographer, who was easily consuming 10-12 liters a day.

Ethiopia 2

A Guide to Ethical Bird Photography

There is nothing like the exhilaration you feel when you capture that perfect shot of a bird in flight or a predator swooping in on its prey. But a good bird photographer is an ethical bird photographer.

We’re going to go over a few ways you can engage in ethical behavior while aiming for that perfect picture. A good general rule of thumb is to always consider the safety and well-being of the birds and their habitat before your shoot. Sometimes, this may mean sacrificing a shot, but a patient, ethical bird photographer with perseverance will be rewarded with both great pictures and the respect of colleagues, fans, and birders everywhere.

Respect Private and Public Property

First, only use private land with permission. Be mindful when viewing birds on private property. Just because you can see the property owner does not mean you can photograph him or her. Always make sure you have permission before making that first frame.

When using public property, be respectful of the rules governing the space, such as hours of operation and designated walking trails.

Zoos, Sanctuaries, and Rehabilitation Centers

Zoos, sanctuaries, and rehabilitation centers can be great places to get experience shooting birds, but some places are more ethical than others. You can do your part to put unethical operations out of business by being conscious of the practices at the places you plan to visit.


– Avoid zoos that are not accredited with the Association of Zoos and Aquariums (AZA).

– Avoid sanctuaries that are not accredited by the Global Federation of Animal Sanctuaries.

– Avoid shooting at game farms. Photos from them are banned from all the leading photography contests, and many magazines, for a reason. If you must shoot at a game farm, be sure to indicate on your cation that it is a “captive” situation and not a free bird.

Avoid Causing the Bird Unnecessary Stress or Disturbances

In all cases, when shooting birds in their natural habitat, you do not want to disrupt their habitat. Being aware and respectful of your surrounding is essential. Here are some tips to remember:

– Avoid trampling through vegetation or disturbing other wildlife.

– Respect the laws of the land, and adhere to minimum distances for approaching wildlife.

– Do not use drones.

– Never try to make a bird fly or encroach on its territory; this disrupts their natural processes.

– Use a telephoto lens in order to maintain enough distance to observe the birds natural behavior in its habitat.

– Avoid flash as much as possible, and never use it on nocturnal animals as it may disrupt their ability to hunt for food or avoid dangers.

Take Extra Precautions With Nesting Birds

While shooting birds that are nesting, you should take some additional measures, including:

– Never use drones.

– Take care not to disrupt the leaves and branches surrounding the nest that are providing careful camouflage and support.

– Avoid drawing the attention of predators by repeatedly walking back and forth to the nest.

– Keep your distance and use a telephoto lens of at least 400-500mm to make sure you have created enough space.

When in doubt refer the North American Nature Photography Association’s Ethics of Field Photography.

Join Us for a Photography Adventure in 2019

– Southern Colorado High Country – July (2 spots left)

– Oman – Late Fall 2019

Visit our Workshops & Photo Tours page to tell us which trip you’re interested in, and we’ll send you more info!


Photography Terms Beginners Should Know

If you are just getting into photography, you need a basis off which to increase your knowledge. That starts with knowing basic photography terms.

Think of photography as carpentry, and think of these photography terms as tools. To get the camera to do what you want it to do, you must learn what these terms are and what job they’re meant to accomplish.


Aspect Ratio

Aspect ratio is the ratio between the width and the height of the image. If you’ve printed anything on a computer before, you know that the “aspect ratio” of a standard piece of paper is 81/2 x 11 – 81/2 inches wide by 11 inches tall.

Aperture

Aperture is the size of the opening in the lens. Aperture is measured in f-stops. A larger aperture lets in more light and results in less depth of field. A smaller aperture lets in less light and yields greater depth of field.

Shutter Speed

The shutter is the part of the camera that when opened lets light in. The speed of the shutter is how fast it opens and closes. Shutter speeds are written in seconds and fractions of a second, i.e. 1/125.  When taking a photo with a longer shutter speed a tripod is recommended to avoid blurring of the image from camera movement. Faster shutter speeds are good for stopping movement while slower speeds can result in blurring or apparent movement that may or may not be desirable depending on the intended effect of the image.

Exposure

Exposure refers to how light or how dark an image is. Exposure is less of a tool and more of a result of a combination of aperture and shutter speed.  Exposure can be increased or decreased using combinations of aperture and shutter speed. In another blog we explain how long exposure and panning can be used to demonstrate motion in photography.

Depth of Field

The depth of field refers to how much of the image stays in focus. Portraits tend to use a shallower depth of field where the subject is in focus and the background is out of focus, while landscape photography often uses a greater depth of field where the whole image is in focus.  Be guided by the rule that says that depth of field will extend twice as far behind the plane of focus as in front.  The smaller the aperture, the greater the depth of field.

ISO

When you are choosing the right digital camera for you, one consideration should be the range of ISOs that the camera is capable of. ISO refers to how sensitive the camera’s sensor is to light. A low ISO like 100 means the camera isn’t as sensitive to light and at that ISO would not be great at capturing subjects in low light. There is a tradeoff, however, cameras used at a high ISO (1000+) tend to produce grainy (digital noise) images. Today’s DSLR’s offer a wide range of availability of ISOs and if looking for a new camera, be sure to find one that offers a large range (say 100-2500) of ISO settings.

For more advanced photography terms, check back in our blog in the near future!

Join us for a Photography Adventure


Interested in taking an exciting and exotic photo tour with professional photographers Jim and Lori Steinberg? Spaces are filling up fast!

We took a five-day hiking trip through Rocky Mountain National Park in July and have now just finished a wonderful five-day photography workshop and train ride through the Colorado Rockies on the 19th-century Durango & Silverton and Cumbres & Toltec Narrow Gauge Scenic Railroads. We already have two trips planned for next year. Check out our Workshops and Photo Tours.

Do you need an MFA in Photography to Succeed?

Is an MFA in photography right for you? A recent article in American Photo Magazine asked that very question. So, how necessary is a postgraduate education in photography? There is no correct answer, of course. But there are a wealth of opinions from smart individuals who have become professional photographers. Some found their MFA program an essential part of their path to success. Others managed to cultivate careers without the help of academia.

Here is a summary of the arguments and a link to the full article. Hopefully it will help you make the decision that is right for you!


Should You Get an MFA in Photography?

YES


  • Have the opportunity to learn the craft alongside others who share you passion.
  • Have the support and guidance of a professional academic program as well as other aspiring photographers.
  • Gain a good theoretical grounding in photography, its history, greatest practitioners, and the major artistic movements that affected it.
  • Gives the photographer a chance outside the work world to explore advanced concepts and ideas without the pressure of sales.
  • Qualify for a teaching job at a college or university. Most higher ed organizations require a masters degree in order to teach.
  • You meet people who may be able to get you a job down the road.

NO

  • The standard two- or three-year programs can cost more than $100,000, leaving it out of reach for many aspiring photographers.
  • Some who have avoided the MFA route have found that nobody ever questioned their qualifications.
  • In commercial photography, where photographers make money outside of academia and art galleries, qualifications matter less than the final product: the pictures themselves.
  • Internships and apprenticeships offer an opportunity to work with a professional and learn the practical aspects of professional photography and at a much smaller cost.

An Alternative Route?


Several universities are offering a middle route: The Master of Professional Studies (MPS) in digital photography, which is more career focused. These programs, which are offered at New York’s School of Visual Arts, Northeastern University in Boston, and elsewhere, prepare students to thrive in the commercial world.


Learn Photography from the Pros


Interested in testing the waters of landscape photography with an award-winning photographer? Your first step doesn’t have to be applying for an MFA in photography. Join other aspiring photographers on a photo adventure with Jim and Lori Steinberg of Steinberg Photography. To see where we are headed next, check out our Workshops and Photo Tours!

Plan Your Landscape Photography Trip around these Natural Phenomena

The world is full of so much natural phenomena, it sometimes gets hard to decide where to go next. If you are planning your next landscape photography trip, don’t overlook these surreal locations.

‘Magical’ Spotted Lake in Osoyoos, British Columbia

Originally called Kliluk by the First Nations of the Okanagan Valley in present day British Columbia, Spotted Lake has been a sacred site for millennia thanks to its odd appearance and therapeutic waters. The lake is highly salty as well as high in mineral content, which explain the strange colorful pools. The pools are made of combinations of magnesium sulphate, calcium, silver, titanium and at least eight other minerals.

The Infinite Cave of Vietnam

Everything about Son Doong Cave in central Vietnam is big. The stalagmites are the tallest known in the world, topping 80 meters (262 feet). The main cave passage is the largest known in the world. At nearly twice as big as its nearest competitor, the cave passage is large enough to fit an entire New York City block inside, including 40 story skyscrapers. You could fly a 747 through it.

Fewer people have seen the inside of Son Doong Cave than have climbed Mount Everest, the world’s tallest mountain. That’s probably because it was only discovered in 2009. Perhaps the most beautiful locations are the two dolines — areas where the cave’s ceiling have collapsed. The dolines are so large, and enough sunlight reaches the cave floor that they sustain rainforests with vibrant ecosystems.

Plans have been presented to build a cable car through the cave, though there has been significant opposition to such a move. If you are planning on visiting, don’t visit after August. The large, fast-flowing subterranean river that runs through the cave makes visiting impossible during the monsoon season.


The Everlasting Storm of Venezuela

They say lightning never strikes twice in the same place, but where the Catatumbo River flows into Lake Maracaibo in Venezuela, it strikes 1.2 million times a year! The “eternal storm of Catatumbo” or Relámpago del Catatumbo in Spanish is an atmospheric phenomena that results in powerful storms developing consistently over an incredibly small area 10 hours a day for around 260 nights a year. Frequently there are over 280 lightning strikes an hour.

The storms are caused by the huge air masses that blow across Lake Maracaibo into the high mountain ridges of the Andes and two smaller mountain ranges. Blocked on three sides, the heat and moisture are rapidly forced upward by the mountains, creating electrical charges, storms and near continuous lightning. Although the myth is that the lightning is created without thunder, this is incorrect. Most people watch the lightning show from around 30 miles away, and thunder is audible only over a range of 15 miles.

Twice in history the flashes have alerted the city’s defenders to would-be invaders: in 1595 when English explorer Sir Francis Drake tried to take the city from the Spanish, and in 1823 when Spanish fleets were exposed and destroyed during the Venezuelan War of Independence.   Do be aware of traveling to Venezuela right now because of the instability and as always be sure to check the State Department’s current STEP warnings before committing to any travel.


Everyday Rogue Waves in Nazaré, Portugal

The only place on earth where surfers can consistently catch 100 foot waves, Nazare, Portugal lies on the Atlantic coast of southwest Europe — not exactly the kind of place you would picture as a surfer’s paradise. What makes it such a unique place is the 16,000 foot submarine canyon that lies just of Nazare’s coast. It acts as a funnel that allows huge ocean swells to approach the shore in a narrow channel and then suddenly rise to astonishing heights in short time, seemingly out of nowhere.

September is the Month of Migration: Is Your Camera Ready?

Luckily, you don’t have to travel far to take in natural phenomena. It’s September and a phenomenon could be happening right now in your very backyard! Check out our blog on the amazing routes of animal migration: A Month of Animal Migration – Is Your Camera Ready?


Choosing the Right Digital Camera for You

Good pictures are made by good photographers, not by good cameras. Nevertheless, choosing the right digital camera is essential if you want to get the most bang for your buck and avoid overpaying for fancy features you’re unlikely to use. Here’s a primer on the tiers of cameras so you can figure out which one is the best fit for you!


Digital Single Lens Reflex (DSLR) Camera


Nikon and Cannon DSLR cameras are cameras of choice for professional photographers. DLSR cameras are big, bulky, and can be expensive; but, well worth the burden if you are trying to make money from your photos. The sensor is a light-sensitive chip that turns light into a digital file.

DSLR cameras are generally ruggedly built and excel at capturing low-contrast subjects even when used in poor lighting conditions. If quality and clarity of images, as well as a host of settings, are what you are looking for, DSLR cameras are the answer. If, however, you need to take pictures discreetly and do not need all the bells and whistles of a higher end camera, DSLRs may not be the best choice for you.  Every time you click the shutter, the mirror closes as it moves up out of the way of the sensor and there is a perceptible slap.

Great if you are…

A professional photographer, serious amateur, or photography enthusiast with a big budget.

Mirrorless Interchangeable Lens (MILC) Cameras


Also called MILCs, these mirrorless cameras are probably the fastest growing subset of digital cameras. When you look through the viewfinder of a DSLR, the image you see is being refracted from a mirror. MILCs don’t have a mirror. They have an LCD screen that is used to compose the picture. Their most obvious advantages over DSLRs are their small size, light weight, flexibility, durability and noiselessness. It’s easy to screw on different lenses and they are virtually silent when taking a picture. All major camera manufacturers have a MILC model, with the Olympus OMD-EM5, Fujifilm X-E2, and Sony NEX Series being among the most popular and well received.  You should also be aware that these cameras can be difficult to use in bright light as most do not have a viewfinder and you need to rely on the LCD viewfinder.

Great if you are…

A travel photographer, photojournalist, sports journalist, or anyone else who wants to take great pictures on the go and/or in extreme environments.

Casual Compacts


These are the small digital cameras that, once ubiquitous, are now harder to find because their quality has been nearly matched by smartphone cameras. Still, for their size and cost, casual compacts accomplish a lot. Casual compacts are small and easy to carry and they generally perform better than smartphone cameras. Some casual compacts are built specifically to perform in rugged environments; they are shock and water-resistant and the lens won’t scratch or crack like that on a smartphone. Other casual compacts like the Nikon Coolpix and Fuji X-1005 have giant APS-C sensors, which are the same size as those used in mid-level DSLR cameras. Though they may one day be completely eclipsed by smartphone cameras, today they definitely hold an edge, and the Panasonic Lumix series is especially good.

Great if you are…

A hobbyist looking to get more serious about your craft. The barrier to entry is very small and the difference in quality between most casual compacts and smartphone cameras is huge.


Need info on Memory Cards?


To learn about memory cards, check out our blog: A Beginner’s Guide to Landscape Photography Memory Cards. 


Master the Art with Steinberg Photography


If you are looking to improve your craft, do it with Jim and Lori Steinberg of Steinberg Photography! We offer photo tours and workshops for everyone from novice to professional photographers. Check out our homepage to find out more!

Creative Photography Projects: Man Tracks Down Subjects after 40 Years to Recreate Pictures

It all began in the late 70s and 80s when paramedic Chris Porsz would spend hours walking around shooting photos of random everyday people in Peterborough, a city in eastern England. Friends posed together, fashionistas cat walked in front of store windows, fellas with funky mohawks flashed sheepish grins, and gentlemen were seen running in the streets. They were all captured as they went about their lives by a man dubbed the “paramedic paparazzo.” These images captured moments long forgotten by most of the subjects.

Until 40 years later when, in an epic undertaking, Porsz decided to track down those subjects to recreate those pictures. He spent seven years finding and convincing people to help with his project by recreating their original poses. It took a fair bit of sleuthing, with a healthy dose of luck and coincidence, to make it all happen, but he managed to pull it off. And in the process of doing so, he was not only able to reconnect with his subjects but also to bring together many of those friends that time had since drifted apart.

It was a great experience for him and for all involved, and you can read more about it and see the pictures here:

Man Tracks Down People He Photographed in the Street 40 Years Ago to Recreate Their Picture

Coming up with your own creative project is a great way to stay on top of your photography game and build a portfolio you’re proud of.

Coming Up With Your Own Creative Photography Projects

Having a creative project to work on can give you a fresh perspective and renew your passion for photography. And you don’t necessarily have to become a master sleuth to come up with your own creative photography projects. In choosing one, think about what drew you to photography in the first place.

Did you love landscapes? Were you obsessed with animal portraits? Looking back at where you came from might give you valuable insight into who you are today and possibly inspire you.

What are your other passions in life? Is there a way you can incorporate them into a series? What brings you joy? Is it your friends, family, favorite coffee spot, or working out? What if you photographed all the gyms or coffee shops in your city? Perhaps you could have the proprietors stand in front of their business (do owners come to resemble their businesses??)

The great thing about your own personal project is that there’s no deadline to meet! You can take all the time you need to figure out where you want to go and what you want to do. Plus, you have the freedom to try things out and decide if they work for you or not. It will focus your mind and your eye and bring a new discipline to your shooting.

When you start to work on your own creative photography projects, you get to shoot the things that inspire you. Looking at your life through the lens, what do you see? And how does it all work together to form a bigger picture?

Learn and Travel with Steinberg Photography

Have you ever considered honing your skills on a photography adventure? Now is a great time to go with professional photographers Jim and Lori Steinberg of Steinberg Photography. We offer numerous exciting workshops and tours that are great for photographers of all skill levels.

Thanks for reading!